Friday, April 27, 2012

"Sushi" Rolls

These are cheap to make and kind of help curb our craving for sushi. I love making this dish because the rice is the only thing that needs to be cooked- fewer dishes and cooler kitchen! Accompanying Miso Soup recipe coming soon.

Stats
Cost to make: About $1.90*, depending on your preferred ingredients.
Portions: 2-3
Pain-in-the-Ass Factor: Significant, until you get the hang of making sushi rolls. (It gets way easier with a little practice)
How long until dinner: 1 hour 30 minutes (active kitchen time: 30 minutes)

Notes
If you don't have a sushi mat, you'll need to invest in one. I bought mine at the Asian market for under 3 dollars. If you don't want to buy one, you can cut the nori into four squares and make little hand-rolled cones.


Having tried both methods, I find this to be more time-consuming, tedious, and more difficult. It does, however, leave more room for experimentation as each one can be different. I'm not good enough at it to give advice, so I would suggest googling it if you are interested. If you go this route, you'll need only half as much rice.

You can use anything you want in the rolls. Leftover chicken or fish, or even sliced egg omelet are good protein in these rolls. Tuna salad is actually not bad, in fact. I use the tofu because we don't usually have leftover meat hanging around, and it keeps well in the fridge.

The flax or sesame seeds are optional. We always have flax seeds around, and I sneak them in whenever I can because of all of the amazing health benefits. I think they add good flavor and texture to the rice. 

Brown rice is a healthier alternative, but white sushi rice is easier to work with. I won't hold it against you if you opt for the easier, tastier rice. :) You still have my permission to abandon it for quicker, cooking, tastier, non pain-in-the-ass white sushi rice. :) I won't hold it against you, but the rolls will be less filling.

Trial and error! Your first couple of rolls will probably not be picturesque, but it gets a lot easier once you start to figure it out.

Down to Business
2 cups uncooked brown rice
2 tablespoons roasted flax seeds or sesame seeds
1 section red or yellow bell pepper, cut into 8 thin strips
4 baby carrots, cut into strips
1/2 cucumber, "
1/3 package alfalfa sprouts
4 oz firm tofu, sliced into 8 1/2" thick sections
4 sheets nori 
about 4 tablespoons sushi vinegar (to taste)


Cook brown rice as usual, with just water. You'll want to undercook it just a little, as it's less likely to get mealy when you're working it if it's slightly dry. When it's still hot, transfer it into a large bowl, at least twice the size needed to contain the rice. Sprinkle with the sushi vinegar while gently folding it around with a rice paddle. Continue until the rice is no longer steaming and slightly cooled. Mix in the flax or sesame seeds. Cover with a kitchen towel and set aside (in the fridge if it will fit).


Prepare your ingredients while the rice cools. Have a bowl of very cold water handy next to your rolling mat.


Lay out a sheet of nori on the sushi mat, shiny side down. Spread a thin, even layer of rice across. You'll need to keep wetting your fingertips in the cold water to keep the rice from sticking to you. Be sure to press very gently so the rice won't get mushy. Spread the rice all the way to the very edge of the side, this will help the end pieces hold together.


Now lay your ingredients across the center.

Pick up the edge of the mat closest to you, and hold onto the ingredients with your fingers while you slowly start to roll the mat over the roll.


Now cut the roll in half 4 times, so you have 8 pieces. Repeat until you have your desired amount of rolls, and you're done!


Spinach Paneer


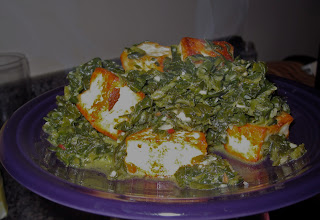
This classic Indian dish is one of my absolute favorite foods. Once you have the cheese on hand, this is quick and easy to make. I also like that it has relatively few ingredients. This also seems to satisfy pizza cravings, with much less guilt.

Stats

Cost to make: Relative. Between 4 and 7 dollars.
Portions: 2-4, as many as 6 if it's not the main course.
Pain-in-the-Ass Factor: Minor
How long until dinner: 30 minutes 

Notes

Make sure you use high quality garlic, as fresh as you can find it. Try to avoid using cloves that have sprouted. Normally I try to salvage them anyway, but not in this case.

You could certainly use fresh spinach, if you are more motivated than I am. Why bother when you can get good frozen spinach that's already been chopped? I also like that I can keep frozen spinach in the freezer for a while and make this dish when the produce starts to run thin before our next grocery trip.

Don't substitute ground spices. The flavor is largely dependent on the complexity that comes from the whole seeds.

Down to Business

3/4 teaspoon cumin seeds
1/4 teaspoon brown mustard seeds
2 1/2 tablespoons finely chopped garlic (about 12-14 cloves)
1 1/2 pounds frozen chopped spinach (thawed and drained if it's in block form)
salt to taste
1 tablespoon lemon juice
2 tablespoons heavy cream
1 recipe of paneer


Pour a thin layer of vegetable oil in a small non-stick pan. Brown each paneer cube on each side. These are best when they are fresh, so only fry as much as you will eat that day. Set the cheese aside.

In a dutch oven or wok, heat 1 tablespoon of vegetable oil on medium. Add the cumin seeds and mustard seeds and fry for about 45 seconds, or until they begin to change color and become fragrant. Add the garlic and saute for another minute. 

Add the spinach cook on medium-low until heated through, salt about half way through. Finish with lemon juice and cream. Add the cheese cubes and serve with rice or flat bread.

Price Breakdown

I buy most of my spices from a little Indian grocery store. I don't notice any sacrifice in quality and they come at a fraction of the price. They don't come in little glass bottles, but you get a larger amount and many of them cost between 1 and 3 dollars. I find good deals on frozen spinach from time to time, as well, since it is a staple in Indian cooking. It may help to find out what the Indian names are for the ingredients you need, as they aren't always labelled in English. Usually the clerk knows what I'm talking about, though.


Wednesday, April 18, 2012

DIY Cheese!


Making your own cheese is surprisingly easy and very satisfying. This is called Paneer, and is a traditional Indian staple. It's a simple white cheese made by curdling whole milk mixed with a little bit of cream. It's a cheap, delicious protein that can be used a lot of ways. It would be great on paninis or pizza. My next posting will be one of my favorite Indian recipes that incorporates this cheese.

Notes
This can be done without the cream if you are in a pinch. The cream does make for a creamier flavor and texture.

I've heard of this being done with lemon juice or citric acid instead of vinegar. I've found the most success with vinegar. I think I have a better tasting, more quickly curdled cheese this way

If you stop after the hanging step, you have ricotta cheese to use in your favorite Italian recipe. You'll be seeing my favorite application when eggplant comes into season.

Down to Business

6 cups whole milk
2/3 cup heavy cream
Plain white vinegar
Cheesecloth

Line a sieve or strainer with a double layer of cheesecloth.


In a stockpot or dutch oven, bring the milk and cream to a boil. Reduce the heat to medium.

Add vinegar 1 tablespoon at a time, stirring thoroughly after each addition, until the curds separate from the whey. There will be no mistaking it when it happens. The liquid will clarify slightly and turn a yellowish color and you'll have cottage cheese-like curds.


Remove from the heat and transfer into the strainer. Lift it out of the strainer and dip it in very cold water. Hang it in the cloth for another 15 minutes. I use a chip clip to attach it to my faucet. Do not leave it like this for more than 20 minutes, as it will dry out too much.


Place the cheese on a board and flatten slightly. Trim away excess cloth, but be sure there's enough to keep the cheese contained. Twist the edges of the cloth and center them on the top of the cheese loaf. Leave it in the cloth, and put it between two boards with a weight on top. Let it press like this for at least 10 minutes. Use a board on the bottom and not a plate, so that the leftover whey can drain away.


After the cheese has firmed up a bit and feels like it will hold together, you've got yourself a block of paneer! Cut into cubes or slices and it's ready to use.


Monday, April 9, 2012

Surprisingly Edible Brown Rice

Brown rice is cheap and edible, but I'm usually sick of it after about two bites. I find this little side to be surprisingly enjoyable. It actually tastes quite similar to Rice-A-Roni, minus the appalling nutrition facts.

Stats
Cost to Make: $1.70 *
Portions: 6
Pain-in-the-Ass Factor: Minor
How long until dinner: 1 hour 20 minutes (Active Kitchen Time: 20 minutes)


Notes
You could make this dish with stock or water, but I think chicken stock really makes it. For convenience as well as frugality, this is a great application for my chicken stock cubes. I use two in this recipe. Plop them in your measuring container and then fill with hot water until you hit the desired measurement, so your volume balances out.

Brown rice can be a tricky customer. Do your best not to stir or or mess with it, as this can make it mushy. I find it to be inconsistent with how much liquid it needs. It's done when tender but still slightly chewy. Sometimes you'll need to add just a little water, and other times you'll end up with extra liquid at the end. If you have quite a bit of liquid and the rice is done, just turn up the heat and uncover the pan until most of it boils away. Cover again and the rice will absorb the excess. If you only have a little, just put the lid on and leave it alone for about ten minutes.


Down to Business
2 tablespoons oil or butter
1 small or 1/2 large onion, fine chopped
1 tablespoon finely chopped garlic
1 cup brown rice
1/3 cup wild rice
2 cups water or stock
1/4 teaspoon thyme
1/4 teaspoon rosemary
1/4 teaspoon oregano
1/4 teaspoon sage
1/4 teaspoon turmeric
salt and pepper to taste

I make this in my dutch oven, but you can also use a deep skillet or wok, as long as you have a lid to match.

Saute the onion and garlic until slightly browned, about 5 minutes. Add the rice and saute, stirring constantly, for another two minutes. Add the seasonings and liquid and bring to a boil. Cover and boil for 2 minutes. Reduce heat to low and simmer for about 40 minutes, until rice is just about done. Turn off the heat, fluff, and then leave covered for about ten minutes.

This will go with almost any meal. We serve it under a poached egg with sauteed spinach on the side. Cheap, healthy, and tasty!

Price Breakdown*


Wild rice can be very expensive, but if you shop around, you'll find it for a reasonable price.
Mine comes from Traders Joe's. $5.00 for 1 pound. That ends up being about 72 cents per recipe.

Don't be a sucker and buy the tiny packages of brown rice at your grocery store. It's a huge rip-off. I buy mine in 9 pound bags from the local Asian market. 50 cents per recipe. Rice is dirt cheap if you buy it in bulk from ethnic food stores.

I also buy most of my basic spices from Trader Joe's, they all cost $2.00 per jar.


*Obviously, food prices will vary depending on where you live and what's available to you.

Cheap Chicken Stock

I never buy chicken stock. It's way too expensive, and usually full of sodium. The common misconception is that you have to boil a whole chicken or a large portion of meat to achieve a flavorful stock. Who has the money to waste perfectly good meat to make stock? Not me.

Poultry prices seem to fluctuate a lot, at least around here. I always grab a whole chicken when I can get one for a good price. (Roasted chicken recipe coming soon) Bonus if it comes with the neck and gizzards still intact. I like the whole chicken instead of individual pieces, because I can salvage the unwanted parts for the stock.

I break down the chicken into two breasts with wings attached (wing tips cut off) and two legs. If you don't know how to do this, the internet is full of how-tos. If you have a good knife, it's much easier than you would think. I apply the four parts to whatever recipe I'm using.

I toss the chicken back, gizzards, neck, and wing tips into the stock pot, a long with any leftover bones and skin from the cooked chicken pieces. I also add a halved onion, 1 or 2 large carrots, and a celery stalk if I have one lying around. I fill the pot with water until my ingredients are completely submerged, and then simmer for about two hours.

Then, I remove all solid material with a wire strainer. I transfer it to the fridge and let it cool for a few hours, until the fat separates and solidifies at the top, then I can easily spoon it off.

I return the stock to the stove and cook it at a low boil until it reduces down to a small enough volume to fit in the ice cube tray I have reserved for this purpose. (measure with water first, then you can just use your liquid measuring cup to check your progress). When the reduced stock comes to room temperature, I pour it into the tray and freeze it. I then transfer the stock cubes into a freezer bag for easier access.

Now, any time I want to make rice, I can just grab a stock cube out of the freezer and toss it in. I find that one cube is usually sufficient for one recipe of rice or whatever else I'm using it for. Of course, your results will vary depending on the size of your tray.

Never throw chicken parts away again! Sometimes I stock pile :) bones and/or gizzards in the freezer until I have enough to make stock.